Stacking solar eclipse photos with Fitswork

Deutsche Version
Fitswork is
a fully featured astronomical image processing software
package written by Jens Dierks.
It can be used for stacking solar eclipse photographs, getting rid of
the strong
radial contrast inherent in these images and enhancing the delicate
coronal
details. Fitswork is freeware! Meanwhile there are even english menus.
The example above has been prepared from 10 digital images
stacked and filtered using the procedure described below. Others
may use other software offering similar
options and use this page as a guideline.
Step 1: Get ready
Material: DSLR-photographs taken with exposure times rangeing from
1/500s to several seconds. The more images are available the better. RAW
images are much better than JPGs.
Software: Fitswork, other graphics packages for a final brushup (e.g. Photoshop), Canon DDP
for RAW conversion. Be sure to get the English language files for Fitswork to follow this tutorial.
Preparations: Although Fitswork can load RAWs I would strongly
suggest to convert them to 16 bit TIFs using RAW-shooter. I wasn't particularly successful with RawDrop and dcraw. One
can also use the Canon software.
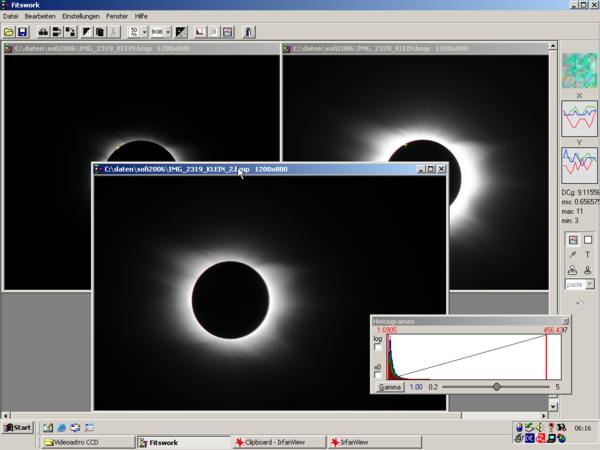
Step 2: Stack the images
- Load the two images with the shortest exposure time File / Open. Display both images conveniently using Window/Tile vertically
-
Mark a detail visible in both images by clicking into the image. You
can A) click on a detail (a yellow cross will be displayed marking the
position). B) you can drag a frame around a star (like delta Cancri on
the elcipse 2008 photos and use Settings/Image Correlation Method/Lightness Center. You can also C) drag a small frame around a consipicious detail
visible on both images. Fitswork will automatically match the structures, but
you have to change a setting of the program by clicking Settings/Image Correlation Method/cross correlation). D) Another method works as follows: Fitswork allows to align and stack images manually,
even at sub-pixel accuracy. Load two images and click Bearbeiten/ combine images with manual offset).
In the menu popping up select "subtract"; the difference image
makes it quite easy to fit the images precisely. You can move the images
pixelwise (integer) or subpixel-wise (subpixel) horizontally and
vertically. I find this new option vary nice for stacking shorter exposures on
prominces and other detail.

- Add the images: Process/Add images (with offset rotation). A sum image is
created. Fitswork uses 3 x 32 bit for RGB, so the
images will never overflow.
- Close the two original images and keep the sum image open
- Open the next images and add it to the sum image. Repeat this until all
images are added. In the end you will have a sum
image containing all information of your eclipse photos. If you want to save the
image, use Datei/Speichern unter and ALWAYS use FITS (32 bit
floating point per color)
Step 3: Appy the Larsen-Sekanina-Filter
Larsen-Sekanina filters have been developed to enhance jets in cometary
comas, but they will remove the radial contrast and enhance the structures
of the corona, too. Basically a rotational unsharp mask will be used. You can
control the filter by changing the diameter and the rotational angle. A
Larsen-Sekanina-filter is implemented in Fitswork and can be easily and rapidly
used.
- Click the center of the sun, a yellow cross will mark the position.
- Click Process/Special Filters/Larsen-Sekanina-Filter
A copy of the sum image will be generated and displayed on the screen

- Select the radius in pixels and the rotation angle in degrees (Rotation in Degrees). I normally use 2 pixels. As a starting point use 1.31 degrees for
the angle. The smaller you choose the angle, the smaller will be the detail
enhanced by the filter.

- Click Calculate for a preview of the result, and confrm the result
with OK. A Larsen-Sekanina mask (LS mask) will be computed. That takes a
while. You can see the progress on a little blue bar.
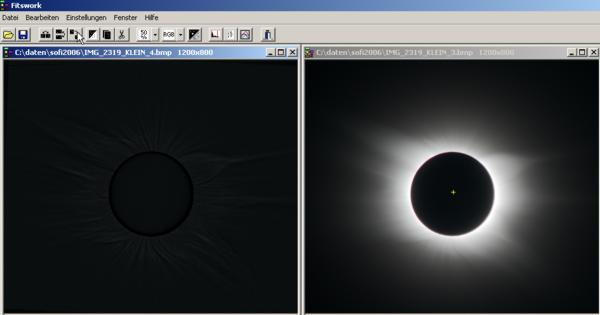
- The LS-mask is the dark image at the left. You now need to multiply both
images (Process/More Image Combining/Image Multiplication). This will enhance dramatically
all detail in the data. If you would prefer a more gentle effect you can also
add the mask and the sum image: (Process/Add images (with offset rotation)).
In this case you can contol the effect by multiplying factors to the mask (Process/Pixel arithmetic/Muliply value)

- Some final scaling on the histogram will be necessary before you save the
image in 3X8 bit format (e.g. BMP). Saving is done through Datei/Speichern
unter. Saving in 16 bit TIF sometimes yields onion
ring effects when the images are loaded in Photohop and should be avoided. It is also wise to keep a copy
of the 32
bit FITS.
Variations
Play around with the rotational angle and prepare several versions. If the
rotational angle is too small artifacts will appear, if it is too large small
detail will be washed out. Since any rotational angle enhances details of
different sizes, prepare a variation of several images with different rotational
angles (e.g. 0.7 degrees, 1 degree, 1.3 degrees, 1.5 degrees) and stack them.
This will remove artifacts and give a more realistic appearance.
LINKS
More on our eclipse
expedition to Turkey
Fred Espenak's homepage shows a method
using Photoshop only
Another good
photoshop-based tutorial is given by Jerry Lodriguss
Fred Bruenjes has written an excellent
camera control software (freeware), which I also used to capture the images
for my composite experiments.
Hartwig Lüthen, fb4a042 (ätt) botanik.uni-hamburg.de